背景
前段时间的一个周末,一个女生让我帮她换一下他的证件照背景,我又没带电脑。我又不好意思拒接,怎么办呢?应用商店下载一个证件照换背景的APP,瞬间换完,我正准备保存时,跳出来一个支付框,如果你要保存,支付2元钱,出于面子,我只好掏了2块钱,保存了。于是我就想,这种技术活,还给别人付钱,自己来撸吧.我是一个专职Android开发,那么就用Android来撸吧.
先来了解一下Android里原生API对图片操作,一般有两种方式,
一种是利用好Canvas绘制图片,
一种是利用Bitmap的原生API,获取像素进行操作
这两种操作我都写了对应的文章,可以快速查看
Android:让你的“女神”逆袭,代码撸彩妆(画妆)
Android:代码撸彩妆 2(大眼,瘦脸,大长腿)
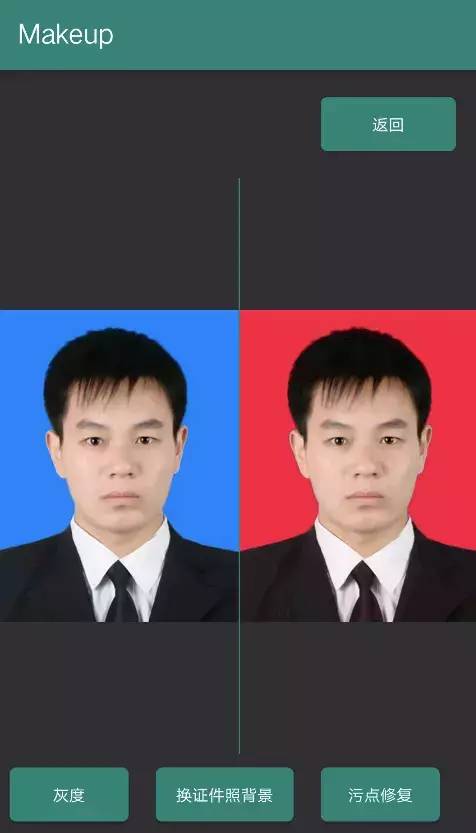
今天的主题是在Android里使用OpenCv来操作图片,并实现两个不同的效果,换证件照背景和污点修复.
代码已经托管在Github上,和上两篇文章代码地址一样,分支with-photo-changecolor
Github ,如果你喜欢,欢迎star 谢谢
Android OpenCv 快速入门
环境搭建
原生的API对图片的操作有限,并且一些颜色空间转化麻烦,效率低,那我们使用一个专业的图片操作库来操作图片,会变得容易些.
OpenCv有很多语言版本,当然底层是c/c++,他支持Android/IOS,Windows,Mac等,我们直接选择Android版本. 那么来搭建一下环境,有两步
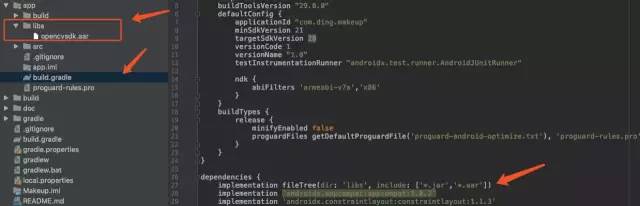
下载OpenCv SDK 地址,将SDK 打包成aar,集成到项目中,快速获取aar,可以直接到我打好的包里获取 Github中获取. 打aar包很简单,用Android Studio打开下载好的SDK,然后到其目录下,执行./gradlew assembleRelease 或者用侧边的辅助工具


集成到你要使用OpenCv的项目,如下
图像灰度测试
集成完成后,进行OpenCV SDK接入成功测试
private void initLoaderOpenCV() {
        boolean success = OpenCVLoader.initDebug();
        if (!success) {
            Log.d(TAG, "初始化失败");
        }
}


 public void gray(View view) {
        Mat src = new Mat();
        Mat dst = new Mat();
        Utils.bitmapToMat(bitmap, src);
        Imgproc.cvtColor(src, dst, Imgproc.COLOR_BGRA2GRAY);
        Bitmap resultBitmap = getResultBitmap();
        Utils.matToBitmap(dst, resultBitmap);
        src.release();
        dst.release();


        showCompare(resultBitmap);
}
如果接入没问题,就可以愉快的使用OpenCV了,是不是很简单.
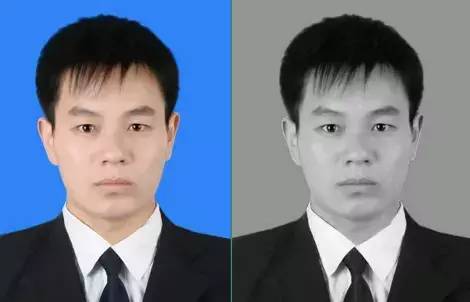
换证件照背景 (从蓝色到红色)
换证件照算法,直接使用了一个c++ 版本算法的,翻译为Android的. c++文章地址
主要步骤:
把RGB图像转换到HSV空间
取背景的一小块20*20,计算蓝色背景的平均色调和饱和度
设置阈值,取出蓝色背景替换为红色背景
把HSV图像转换会RGB空间
滤波器去除边缘效应
Android 代码如下:
 private void startDetail() {
        Mat image = new Mat();
        Utils.bitmapToMat(bitmap, image);


        Mat hsvImg = new Mat();
        Imgproc.cvtColor(image, hsvImg, Imgproc.COLOR_BGR2HSV);
        List<Mat> list = new ArrayList<>();
        Core.split(hsvImg, list);


        Mat roiH = list.get(0).submat(new Rect(0, 0, 20, 20));
        Mat roiS = list.get(1).submat(new Rect(0, 0, 20, 20));


        Log.i(TAG,"start sum bg");
        int SumH = 0;
        int SumS = 0;
        byte[] h = new byte[1];
        byte[] s = new byte[1];
        //取一块蓝色背景,计算出它的平均色调和平均饱和度
        for (int i = 0; i < 20; i++) {
            for (int j = 0; j < 20; j++) {
                roiH.get(j, i, h);
                roiS.get(j, i, s);


                SumH = h[0] + SumH;
                SumS = s[0] + SumS;
            }
        }
        int avgH, avgS;//蓝底的平均色调和平均饱和度
        avgH = SumH / 400;
        avgS = SumS / 400;

        Log.i(TAG,"depth="+list.get(0).depth());
        Log.i(TAG,"start sum detail all photo");
        //遍历整个图像
        int nl = hsvImg.height();
        int nc = hsvImg.width();
//        byte[] changeColor = new byte[]{127};


        byte[] hArray = new byte[nl * nc];
        byte[] sArray = new byte[nl * nc];
        byte[] vArray = new byte[nl * nc];


        list.get(0).get(0,0,hArray);
        list.get(1).get(0,0,sArray);
//        list.get(2).get(0,0,vArray);


        int row,index;
        for (int j = 0; j < nl; j++) {
            row = j * nc;
            for (int i = 0; i < nc; i++) {
                index = row + i;


                if(hArray[index] <= (avgH + 20) && hArray[index] >= (avgH - 20)
                        && sArray[index] <= (avgS + 150)
                        && sArray[index] >= (avgS -150)
                ){
                    hArray[index] = 127;
//                    sArray[index] = 0;
//                    vArray[index] = (byte) 255;
                }
            }
        }


        list.get(0).put(0,0,hArray);
        list.get(1).put(0,0,sArray);
//        list.get(2).put(0,0,vArray);


        Log.i(TAG,"merge photo");
        Core.merge(list,hsvImg);


        Imgproc.cvtColor(hsvImg,image, Imgproc.COLOR_HSV2BGR);


        Bitmap resultBitmap = getResultBitmap();
        Utils.matToBitmap(image,resultBitmap);
        Message obtain = Message.obtain();
        obtain.obj = resultBitmap;
        handler.sendMessage(obtain);
    }
Mat 为OpenCV中图像的保存,很类似Android里的Bitmap,他和Bitmap转化需要借助OpenCv的Utils进行,OpenCV的核心API可以查看官网,此处主要使用了Imgproc
效果
污点修复
修复原理
先来说一下污点修复的算法,一篇论文提到的 《An ImageInpainting Technique Based On the Fast Marching Method》
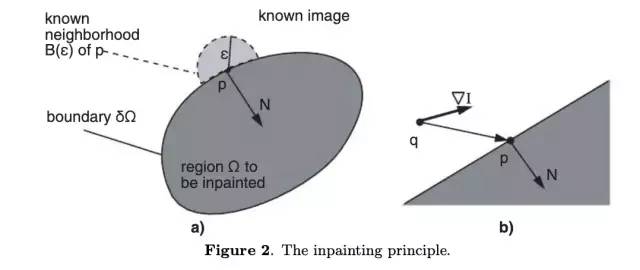
可以简单理解为p点为待修复区域,ε为修复半径,把ε的值区域的值计算出来,用于修复P点,直到修复整个Ω区域.
详细可以查看论文:https://www.docin.com/p-92077277.html
实际修复
OpenCV 里面已经实现了此算法,具体方法如下:
//OpenCV Photo.java
 /**
     * Restores the selected region in an image using the region neighborhood.
     *
     * @param src Input 8-bit, 16-bit unsigned or 32-bit float 1-channel or 8-bit 3-channel image.
     * @param inpaintMask Inpainting mask, 8-bit 1-channel image. Non-zero pixels indicate the area that
     * needs to be inpainted.
     * @param dst Output image with the same size and type as src .
     * @param inpaintRadius Radius of a circular neighborhood of each point inpainted that is considered
     * by the algorithm.
     * @param flags Inpainting method that could be cv::INPAINT_NS or cv::INPAINT_TELEA
     *
     * The function reconstructs the selected image area from the pixel near the area boundary. The
     * function may be used to remove dust and scratches from a scanned photo, or to remove undesirable
     * objects from still images or video. See <http://en.wikipedia.org/wiki/Inpainting> for more details.
     *
     * <b>Note:</b>
     * <ul>
     *   <li>
     *       An example using the inpainting technique can be found at
     *         opencv_source_code/samples/cpp/inpaint.cpp
     *   </li>
     *   <li>
     *       (Python) An example using the inpainting technique can be found at
     *         opencv_source_code/samples/python/inpaint.py
     *   </li>
     * </ul>
     */
    public static void inpaint(Mat src, Mat inpaintMask, Mat dst, double inpaintRadius, int flags) {
        inpaint_0(src.nativeObj, inpaintMask.nativeObj, dst.nativeObj, inpaintRadius, flags);
    }
其中上面提到的原理算法为,INPAINT_TELEA.
来一张实际的图操作修复一下,如下:
    private void startInpaint() {
        bitmap = BitmapUtils.getBitmapByAssetsNameRGB(this,"test.png");
        Mat desc = new Mat(bitmap.getHeight(),bitmap.getWidth(),CvType.CV_8UC3);
        //转化为mat对象
        Utils.bitmapToMat(bitmap, desc,true);
        //转化为3通道图像
        Mat src = new Mat();
        Imgproc.cvtColor(desc,src,Imgproc.COLOR_RGBA2RGB);
        //灰度图像
        Mat srcGray = new Mat();
        Imgproc.cvtColor(src, srcGray, Imgproc.COLOR_RGB2GRAY);
        //中值滤波去燥
        Imgproc.medianBlur(srcGray,srcGray,3);
        //获取污点的二值化图像
        Mat srcThresh = new Mat();
        Imgproc.threshold(srcGray,srcThresh,242,255,Imgproc.THRESH_BINARY);


        Log.i("test","srcThresh channels:"+srcThresh.channels() + ",type:"+ CvType.typeToString(CvType.depth(srcThresh.type())));
        Log.i("test","src channels:"+src.channels() + ",type:"+ CvType.typeToString(CvType.depth(src.type())));
//        Bitmap resultBitmap = getResultBitmap();
//        Utils.matToBitmap(srcThresh, resultBitmap);

        //修复图像
        Mat inpaintResult = new Mat();
        Photo.inpaint(src,srcThresh,inpaintResult,3,Photo.INPAINT_TELEA);
        //把结果转化为bitmap 用于显示
        Bitmap resultBitmap = getResultBitmap();
        Utils.matToBitmap(inpaintResult, resultBitmap);
        Message obtain = Message.obtain();
        obtain.obj = resultBitmap;
        handler.sendMessage(obtain);
    }
效果
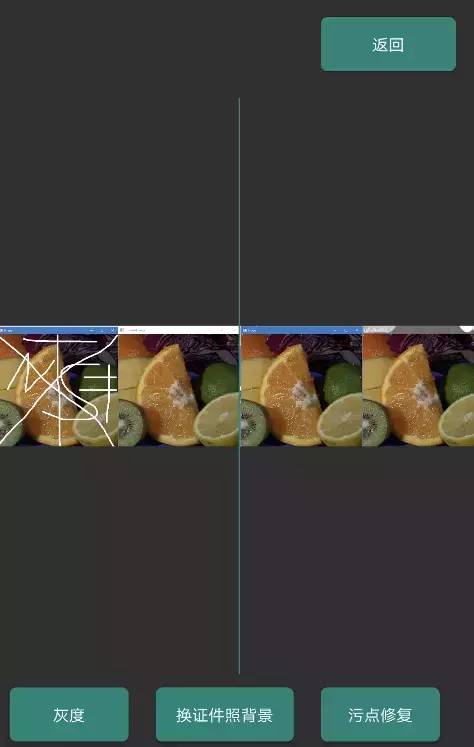
图片来源:www.cnblogs.com/hellowooorl…
总结
本篇文章,主要介绍了OpenCV怎么快速使用,并结合了两个实际的例子,来进一步说明借助OpenCV里的API,可以实现很多不错的效果.
文中图片来源网络,若又侵权,请联系作者,立刻删除!
本篇文章的两个例子代码地址:https://github.com/DingProg/Makeup/tree/with-photo-changecolor ,如果你喜欢迎star,后续关于图片的操作,都会在此库里更新.
喜欢 就关注吧,欢迎投稿!
本网站文章均为原创内容,并可随意转载,但请标明本文链接
如有任何疑问可在文章底部留言。为了防止恶意评论,本博客现已开启留言审核功能。但是博主会在后台第一时间看到您的留言,并会在第一时间对您的留言进行回复!欢迎交流!
本文链接: https://leetcode.jp/android修图(换证件照背景,污点修复)/